Quilling is a unique and fascinating art form that involves rolling and shaping thin strips of paper to create intricate designs. Although it originated in the Renaissance period, quilling has seen a resurgence in popularity in recent years. This paper craft is not only a fun and relaxing hobby, but it also allows you to create stunning and intricate designs that are sure to impress.
Quilling As an Art Form
Quilling, also known as paper filigree, is an art form that involves rolling and shaping strips of paper to create intricate designs. It is a centuries-old craft that was popular in the Renaissance period and has since been enjoyed by artists and crafters all over the world. Quilling has seen a resurgence in popularity in recent years, as people have rediscovered the joy of creating beautiful designs with paper.
One of the most appealing aspects of quilling is its simplicity. All you need to get started is a few basic materials – paper strips, a quilling tool, glue, and scissors. There are many different types of paper that can be used for quilling, including colored paper, metallic paper, and even recycled materials like old magazine pages or book pages.
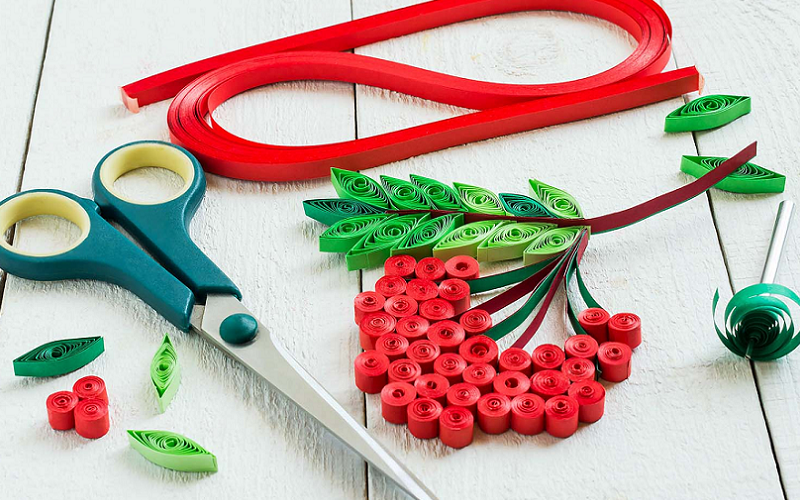
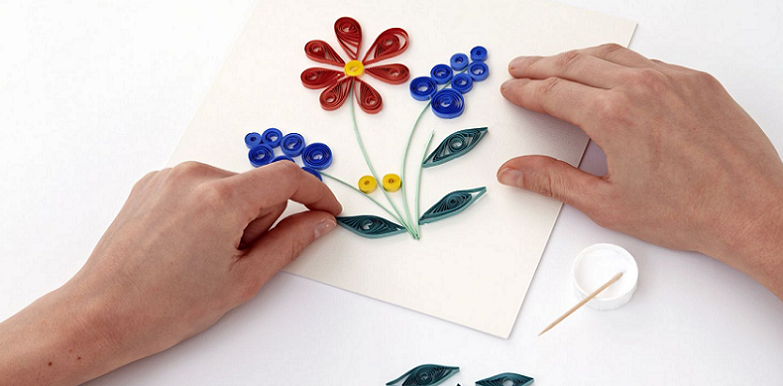
The basic techniques of quilling involve creating various shapes by rolling and shaping the paper strips. These shapes can include tight circles, loose coils, teardrop shapes, marquise shapes, and square shapes. By combining these basic shapes, you can create more complex designs, such as flowers, animals, and even 3D objects.
While the basic techniques of quilling are relatively easy to master, more advanced quilling techniques can be used to create even more intricate designs. Fringed flowers, for example, involve cutting the edges of paper strips to create a fringe effect, while 3D quilling involves creating multiple layers of paper to give a design depth and dimension.
Quilling also offers a number of other benefits. For one, it is a very affordable hobby – paper strips are inexpensive and can be found at most craft stores. Quilling is also a relaxing and meditative activity that can help reduce stress and anxiety. And finally, quilling is a great way to exercise your creativity and make unique and personalized gifts for friends and family.
Quilling Materials
Quilling is an art form that requires very few materials, making it a great hobby for beginners and seasoned artists alike. Here are the basic materials needed to get started with quilling:
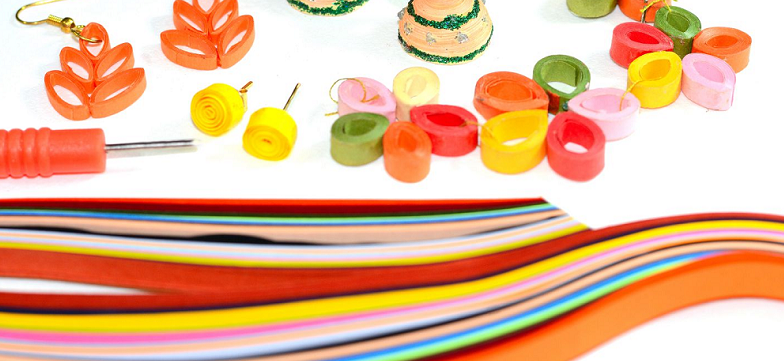
- Paper strips: The most important material for quilling is the paper strips. These strips can be made from a variety of materials, including colored paper, metallic paper, or even recycled materials like old magazine pages or book pages. The thickness of the paper will affect how easy it is to roll and shape the paper strips.
- Quilling tool: A quilling tool is used to help roll the paper strips into various shapes. There are many different types of quilling tools available, including slotted tools, needle tools, and electric quilling tools. A slotted quilling tool is the most common and is recommended for beginners.
- Glue: Glue is used to hold the paper strips in place once they have been rolled and shaped. A clear-drying glue is recommended to avoid any visible glue marks on the finished design.
- Ruler: A ruler is used to measure and cut the paper strips to the desired length. A metal ruler is recommended to make straight, precise cuts.
- Scissors: Scissors are used to cut the paper strips to the desired width and length. A sharp pair of scissors is recommended to make clean cuts.
There are a few optional materials that can make quilling even easier and more enjoyable. These include:
- Quilling board: A quilling board is a flat board with evenly spaced holes that can be used to create uniform shapes. It is especially useful for creating consistent shapes and sizes for more complex designs.
- Tweezers: Tweezers can be used to help hold and manipulate the paper strips during the quilling process, especially for smaller, more intricate designs.
- Template: A template can be used to create more complex designs by providing a guide for the placement of each paper strip.

Basic Techniques of Quilling
The basic techniques of quilling involve creating different shapes by rolling and shaping the paper strips. One of the most common shapes is a tight circle, which is made by rolling the paper strip tightly around a quilling tool.
Another shape is the loose coil, which is created by rolling the paper strip more loosely around the quilling tool. Teardrop shapes are made by pinching one end of a tight coil, while marquise shapes are created by pinching both ends of a tight coil.
Finally, square shapes are made by folding and pinching a paper strip to create a right angle. By combining these basic shapes, you can create more complex designs, such as flowers, animals, and even 3D objects.
Advanced Techniques of Quilling
Advanced techniques in quilling involve combining the basic shapes to create more complex designs. For example, by combining tight coils, loose coils, teardrop shapes, and marquise shapes, you can create flowers with multiple layers and petals.
Fringed flowers are another advanced technique that involves creating a fringe effect on the edges of paper strips to add texture and dimension to a design. 3D quilling is another advanced technique that involves creating multiple layers of paper strips to give a design depth and dimension.
Quilling can be used to create jewelry, such as earrings and necklaces, by rolling and shaping paper strips into intricate designs and attaching them to findings like earring hooks and chains.
By exploring advanced techniques in quilling, you can take your paper art to the next level and create truly unique and stunning designs.
Quilling Tips and Tricks
There are several tips and tricks that can make quilling easier and more enjoyable. First, choose the right paper for your project – thicker paper is easier to roll and shape, while thinner paper is more delicate and may require more skill.
Using a quilling board can help you create uniform shapes and sizes, while making a template for intricate designs can help guide your paper strips into the right place. When working on a design, it is also helpful to work on a flat surface and to keep your paper strips organized and within reach.
Be patient and take your time, especially when working on more complex designs. By following these tips and tricks, you can make quilling a fun and rewarding experience.