
Paper mache is an ancient art form that has been used for centuries to create sculptures, masks, and other decorations. Not only is it a fun and creative way to make art, but it’s also an eco-friendly way to repurpose old paper that would otherwise go to waste. Here we explore the basics of paper mache art, including how to make the paste, how to create sculptures and decorations, and how to decorate and finish your final pieces.
What Is Paper Mache?
Paper mache, also known as papier-mâché, is an art form that involves creating sculptures, masks, and other decorations using a mixture of recycled paper and a binding agent such as flour or glue.
The paper is torn or cut into small pieces and then soaked in the binding agent to form a paste. The paste is then used to build up layers of paper onto a base form, which could be made from wire, cardboard, or other materials.
As the layers dry, they become hard and durable, forming a solid shape. Once the desired shape is achieved, the paper mache sculpture or decoration can be sanded, painted, and decorated with various embellishments to create a unique and personalized work of art.
Materials Needed for Paper Mache
To create paper mache art, you will need several materials. The materials needed for paper mache are:
- Recycled paper: this can be any type of paper, such as newspaper, magazine pages, or tissue paper. The paper will be torn or cut into small pieces to create the paper mache paste.
- Binding agent: this is what holds the paper pieces together to form a paste. You can use either flour or glue for this. Flour paste is made by mixing flour and water to create a smooth, thick mixture. Glue paste is made by mixing glue and water to create a thinner, runnier mixture.
- Water: this is added to the binding agent to create the paste. You will need enough water to create a smooth, workable consistency.
- Base form: this is the object onto which you will build your paper mache sculpture or decoration. The base form can be made from wire, cardboard, or other materials.
- Paint and other decorations: once your paper mache sculpture or decoration is complete, you can paint and decorate it however you like. You can use acrylic or tempera paint, or even spray paint, to add color and texture to your creation. You can also add glitter, beads, or other embellishments to make your paper mache art unique and personalized.

Making Paper Mache Paste
To create paper mache paste, you will need a binding agent, such as flour or glue, and water. The paste is used to hold the paper pieces together as you build your sculpture or decoration.
To make flour paste, mix equal parts flour and water in a mixing bowl until you get a smooth and consistent mixture. If the paste is too thick, add more water, and if it is too thin, add more flour. You can also add a pinch of salt to the mixture to prevent mold from forming.
To make glue paste, mix white glue with water in a 1:1 ratio. Stir the mixture until it is well combined and has a smooth consistency. You can adjust the thickness of the paste by adding more or less water.
When making paper mache paste, get the right consistency. The paste should be smooth and not too runny, but also not too thick. If the paste is too thin, it won’t hold the paper pieces together, and if it is too thick, it will be difficult to work with. Start with a small amount of water or binding agent, and gradually add more until you get the desired consistency.
Creating Paper Mache Sculptures
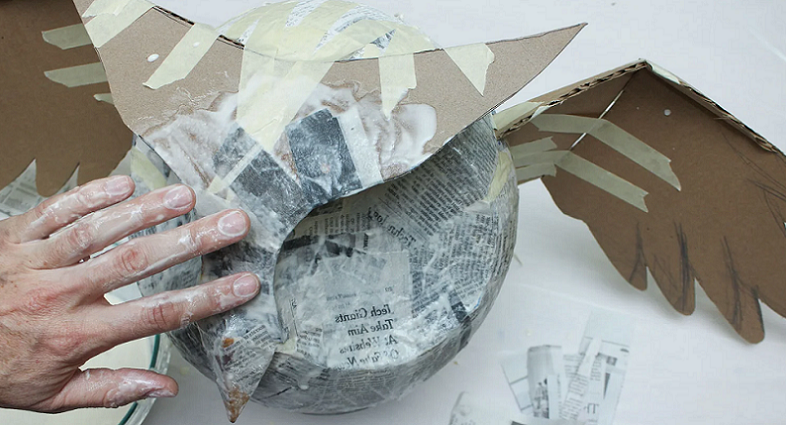
Creating paper mache sculptures is a fun and creative way to express your artistic talents. To get started, you will need a base form onto which you will build your sculpture using paper mache paste. You can use wire, cardboard, or other materials to create the base form, depending on the size and shape of your sculpture.
Once you have your base form, tear or cut recycled paper into small pieces and mix them with your paper mache paste. Start by covering the base form with a layer of paste-soaked paper, and then continue building up layers until you achieve the desired thickness and shape. You can use your fingers or a brush to smooth out the layers and remove any air pockets.
As the layers dry, they will become hard and durable, creating a solid structure for your sculpture. You can add more layers to create more complex shapes and details, such as facial features or intricate designs.
Once your sculpture is complete, let it dry completely before painting and decorating. You can use acrylic or tempera paint to add color and texture to your creation, and you can also add other decorations such as glitter, beads, or other embellishments to make your sculpture unique and personalized.

Creating Paper Mache Decorations
Creating paper mache decorations is a fun and creative way to make unique and personalized decor for your home or special occasions. To get started, you will need a base form onto which you will build your decoration using paper mache paste. You can use wire, cardboard, or other materials to create the base form, depending on the size and shape of your decoration.
Once you have your base form, tear or cut recycled paper into small pieces and mix them with your paper mache paste. Start by covering the base form with a layer of paste-soaked paper, and then continue building up layers until you achieve the desired thickness and shape. You can use your fingers or a brush to smooth out the layers and remove any air pockets.
As the layers dry, they will become hard and durable, creating a solid structure for your decoration. You can add more layers to create more complex shapes and details, such as patterns or textures.
Once your decoration is complete, let it dry completely before painting and decorating. You can use acrylic or tempera paint to add color and texture to your creation, and you can also add other decorations such as glitter, beads, or other embellishments to make your decoration unique and personalized.
Painting and Decorating Paper Mache Art
Painting and decorating paper mache art is the final step in creating a unique and personalized work of art. Once your paper mache sculpture or decoration is dry, you can begin to paint and decorate it using a variety of techniques and materials.
To paint your paper mache art, first choose the type of paint that you want to use. Acrylic and tempera paints work well for paper mache, as they provide good coverage and dry quickly. You can also use spray paint for a smooth and even finish. Use a brush or sponge to apply the paint to your art, and allow each layer to dry completely before adding another layer.
To decorate your paper mache art, you can add other embellishments such as glitter, beads, or sequins. These can be glued onto the surface of your art using a strong adhesive such as craft glue. You can also use other materials such as fabric or ribbon to create a unique and textured look.
When painting and decorating paper mache art, take your time and work carefully. Use small brushes and tools to add details and intricate designs, and be patient as each layer dries before adding another layer or decoration.